Wednesday, May 29, 2013

Mitad Y Mitad Tortillas


Austin is nowhere near short of delicious tortillas. However, why buy when you can make?


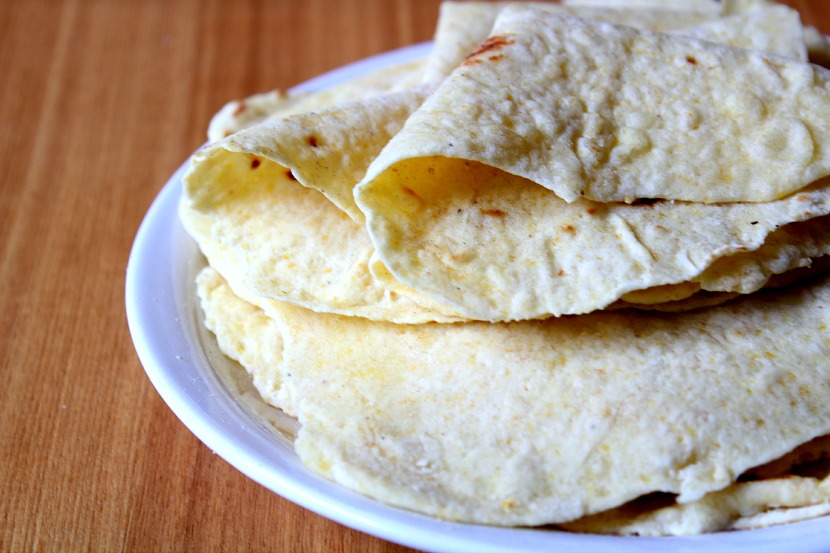
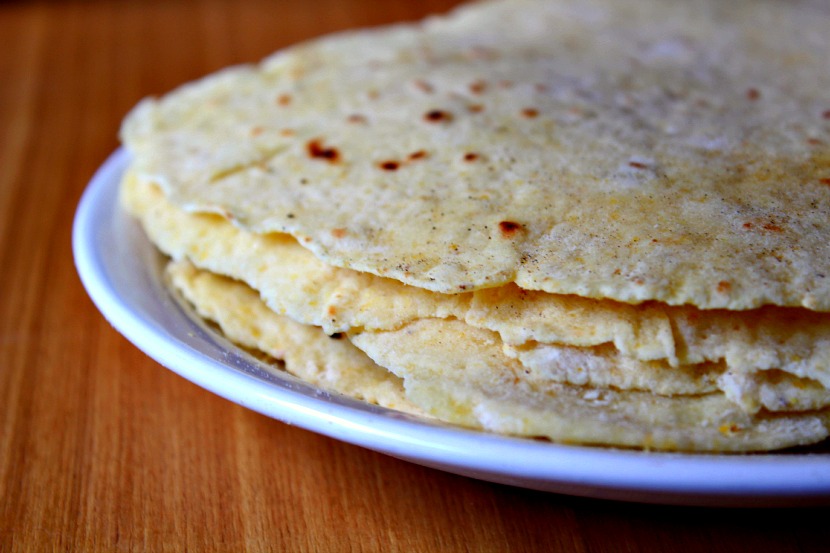
Our local fancy HEB, Central Market, makes these fantastic Mitad & Mitad tortillas. With all the structure of a flour tortilla and the wonderful flavor of a corn tortilla, they offer the best of both worlds. I needed to replicate these babies in my kitchen, and this weekend I finally got a chance to do that. Now I can have homemade Mitad Y Mitad Tortillas whenever I want (and so can you)!

Mitad Y Mitad Tortillas
Ingredients:
  • 1 1/4 cup all purpose flour
  • 1/4 cup fine corn meal
  • 1 teaspoon baking powder
  • 1/4 teaspoon salt
  • 2 1/2 tablespoons Earth Balance or olive oil (they both work fine!)
  • 1/2 cup very hot water
1. Mix together the flour, cornmeal, baking powder and salt. 
2. Pour the oil into the flour mixture and mix it in with a fork. The mixture should be crumbly. If you’re using Earth Balance, just cut it into the flour with your fingers for the same crumbly effect.
3. Pour the hot water into the flour and mix just until it comes together and a ball forms. Let the dough sit covered for 20-30 minutes.
4. Cut the dough into thirds. Cut the thirds in half. Cut each half in half again. You should have twelve equal balls. 
5. Heat a cast iron skillet over medium high heat. Roll your first ball of dough into a thin circle. If it’s not totally circular, it’s fine. Who’s picky about shapes anyway?
6. Once the skillet is preheated, throw on your rolled out tortilla. Once bubbles form on the surface, flip it. Let that side cook for a few seconds. The whole thing will happen really quickly. Remove the tortilla and place it in a towel to stay soft and warm.
7. Repeat with the remaining dough until you have twelve cooked tortillas.
8. Eat em! Make tacos, burritos, enchiladas, ect. OR drizzle one with agave nectar, roll it up and enjoy. OR dip them into salsa or Food for Lovers Vegan Queso. Whoa baby.

If you find yourself at a Central Market be sure to pick up their Mitad & Mitad tortillas to try. This recipe is great, but so are the originals!

Tuesday, May 28, 2013

Tex-Mex Vegan BBQ for Memorial Day

On Memorial Day my husband and I threw ourselves a Tex-Mex Vegan BBQ. To be clear, I wanted a pretty even melding of the Tex and the Mex. A fusion, if you will. I was not necessarily looking to stay in the confines of the delicious regional cuisine of the same name. Of course the Tex-Mex we all know and love influences much of what I touch so I don’t know how successful I was! 

We started off with some drinks and snacks while the grill got going!


  • You know we had some margaritas! Hand squeezed lime juice, agave nectar and tequila were the only ingredients in this classic cocktail. 
  • We needed something the keep our appetites satiated so we snacked on some chips and salsa. The salsa was Roasted Habanero Hot Salsa made by a small salsa company in San Antonio, Tio Mike’s. I’m in love with this salsa! It’s so flavorful with a generous heat.
  • Naturally the margaritas ran out so we switched to beer. We bought some Good JuJu by Left Hand Brewing Company and a small growler at The Growler Room, a new business in Austin dedicated to filling your growlers. Look at that amazing Come and Fill It growler that I bought there! Google “Battle of Gonzales” if you need some context. It’s a really bitchin growler.


It didn’t take long for our food to get on and off the grill. Mealtime was really good!


We had:
  • Grilled portabellas with BBQ sauce, caramelized onions and avocado on Texas Toast
  • Carne Asada made with Gardein Beefless Tips on homemade Mitad Y Mitad Tortillas – I marinated the beefless tips in orange juice, lime juice, garlic, jalapelo, cilantro, cumin and olive oil for a few hours before grilling!
  • Texas Toast – broiled of course
  • Dessert – Peaches with Lime Whipped Cream and a drizzle of Pineapple Tequila syrup. This dessert will be getting it’s own post!

It was a wonderful kick off to summer! I look forward to more BBQs, more summer food and obviously more margaritas. Hello Summer!

Sunday, May 26, 2013

Tofu Pad Thai


There is something about Pad Thai that is just addicting. I resisted trying Pad Thai for so long because it seemed so obvious. It’s what everyone orders! I don’t remember when I finally gave in, but I can tell you that it was at a wonderful Thai restaurant in downtown Austin called Thai Passion. It was an eye opening experience. The freshness of the bean sprouts and lime, the salty tanginess of the sauce, I couldn’t get over it. Two days later I went back for more. I was obsessed!


Since going out for Pad Thai every other day is not sustainable, I needed a recipe. This one is very basic. Pad Thai really doesn’t need to be complicated to be delicious. You will need to buy some special ingredients, but they’re not too hard to come by. Give it a try!

Tofu Pad Thai 
Makes 4 Servings
Ingredients:
  • 12 ounces extra firm tofu, sliced into four blocks and pressed (instructions for pressing tofu)
  • 8 ounces rice noodles (like these though I’ve never used that brand. I just get whatever looks good and inexpensive at the grocery store), cooked according to the package directions
Sauce:
  • 3/4 cup tamarind concentrate (available in well stocked grocery stores, Asian markets and online)
  • 3/4 cup vegetarian fish sauce (available in Asian markets and online or make your own)
  • 1-2 tablespoons soy sauce
  • 2-4 tablespoons palm or brown sugar
  • ground cayenne pepper to taste
Pad Thai:
  • 3-4 tablespoons oil, like peanut or rice bran
  • 3 garlic cloves, sliced
  • 1/2 cup unsalted roasted peanuts, crushed
  • 2 cups bean sprouts
  • scallions, sliced
  • 1 lime, cut into four wedges
  • cilantro, chopped (optional)*1
1. Bring a small pot of heavily salted water to a boil. Remove the pot from the heat and add the tofu to soak for 15 minutes. After 15 minutes, remove the tofu and pat dry. Cut the tofu into 1/2 inch cubes and set aside.*2
2. In a small pot, mix together the tamarind and fish sauce. Add the sugar starting with 2 tablespoons and the soy sauce starting with 1 tablespoon. Give the sauce a taste and adjust the sweetness/saltiness to your preferences. (Tamarind concentrates and fish sauces vary in sweetness and saltiness so it’s best to add sugar/soy sauce according to your taste) Add the cayenne pepper to taste. Put the sauce over low heat and stir occasionally. Don’t let it boil! Just warm it up.
3. In a large pan or wok, heat your oil over medium high heat. When the oil is hot, add the tofu and stir fry until they’re nice and golden. Add more oil if need be.
4. Add the garlic, noodles and half of the peanuts and give the whole thing a good stir with a few choice tosses.
5. Add the sauce and toss everything to combine. Give it a taste for saltiness. 
6. Divide the Pad Thai among four servings. Top each serving with 1/2 cup bean sprouts, crushed peanuts, scallions, a lime wedge and cilantro.
7. Eat immediately!

*2-You can skip the salt water soak and move onto the pan fry. Know that the soak makes the tofu really extra delicious. Read this Herbivoracious article on the matter!
*1-I don’t know how authentic the cilantro addition is, but I love it!

Tuesday, May 14, 2013

Mother’s Day Brunch


For Mother’s Day this year I decided to throw a Mother’s Day Brunch for the moms in my life. We never do anything special to celebrate Mother’s Day except little gifts and a family dinner which is fun but I wanted more. So this year I invited my Mom, Oma, Aunt (aka Wine Mother – it’s a thing), Grandmother and Godmother (also an Aunt) over to my place for wine, food, company, flowers and group photos!


Can you guess which one is my Mom? Hint – We’re making the same face! Of course we are.

We ate a lot of food! Like fruit salad:

Biscuits with Black Currant Jam, Speculoos and Orange Honey Earth Balance:

 Mini Farinatas with Mushroom Relish

Vegan Honey Mustard Chicken Salad (recipe below!) and so much more!

The Mother’s Day Brunch was beautiful and fun! It was really great to be surrounded by such strong and wonderful women. I hope everyone had as great a Mother’s Day as I did!

And because it was just so good, here’s the recipe for the Vegan Honey Mustard Chicken Salad. Yum!

Vegan Honey Mustard Chicken Salad
Adapted from Honey Roasted Chicken Salad from Iowagirleats.com
Ingredients:
  • 12 ounces vegan chicken, like Beyond Meat or Gardein, chopped
  • 1/2 – 3/4 cup celery (depending on how much you love celery), chopped
  • 1/2 cup raw almonds, coarsely chopped
  • 1/2 cup plain nondairy yogurt
  • 1 tablespoon vegan honey, like Bee Free Honee or Sohgave Honey Flavored Agave Nectar
  • 1 tablespoon Dijon mustard
  • Salt and Pepper to taste
1. Add the vegan chicken, celery and almonds to a bowl and stir them to combine. Set aside.
2. In a smaller bowl whisk together the yogurt, honey and mustard. Add salt and pepper to taste. 
3. Pour the dressing over the chicken mixture and stir to combine. Serve cold with bread, crackers, spoons, whatever you want!

Friday, May 10, 2013

Mushroom Miso Ramen with Wontons and Spinach

Update – I just want to give a big big big big BIG (ok huge) “Thank You!” to all those who voted for my recipe in the Soup category. There was some steep competition and I feel very honored to have won! Thank you!!

Even Eddie is excited!


Today is the Virtual Vegan Potluck and I am thrilled to be sharing my Mushroom Miso Ramen with Wontons and Spinach! I’m so excited to see what everyone has in store and I hope you’re all having a great time. Now what everyone is here for: Ramen!

Vegan Ramen

I have an undying love for ramen. I love the slurp of the noodles, the warmth of the woodsy broth. My recipe is all about the broth. It is the most important part of this recipe, and I cannot stress this enough. It’s deep and homey and absolutely unable to be substituted. 

For the noodles, I use these Chinese Noodles by KA*ME, but you can use any vegan ramen pack. Just throw away the seasoning! However, if you have access to the KA*ME noodles, I highly recommend them. They have only four ingredients, and don’t get mushy like the cheaper packs do!

I usually keep my toppings very simple, but the idea of adding wontons to ramen was just too decadent and fun to pass up! I also love that it combines the two cultures responsible for ramen, the Chinese and Japanese. Though ramen is actually Chinese in origin, it is clearly the Japanese who made it what it is today. I used these Homemade Shiitake and Tofu Wontons but you can use any vegan dumpling to cut down on the labor.

One more thing (and this is very important): slurp your noodles. It’s not rude, it’s expected!


Mushroom Miso Ramen with Wontons and Spinach
Ingredients:
  • 6 cups mushroom broth (recipe below)
  • 4 – 6 ounces dry ramen noodles (depends on your package(s)!)
  • 1 cup spinach, chopped
  • 6-8 frozen wontons or dumplings (like my Homemade Shiitake and Tofu Wontons)
  • 2-2 1/2 tablespoons miso paste(I used red), to taste
  • 2 scallions, sliced
  • chili oil for garnish (optional)
1. Bring the broth to a boil and add the noodles, spinach and wontons. Boil for the amount of time suggested by the ramen pack, usually 3-4 minutes.
2. Remove the Ramen from the heat and stir in the miso paste. Stir stir and stir until the miso is completely dissolved. 
3. Split the Ramen equally between two bowls. I do this by using tongs to move the noodles and wontons to the bowls. Then I pour the broth over the noodles. Top with scallions and chili oil. Eat, slurp and enjoy immediately! Serves two.

Mushroom Broth
Adapted from the Mushroom Stock in Vegan Planet
Ingredients:
  • 4 dried shiitake or porcini mushrooms, soaked in 1 cup of hot water for 20 minutes
  • 1 large onion, quartered
  • 1 celery rib, chopped
  • 8 cups water
  • 8 ounces button mushroom, chopped
  • 3 garlic cloves, crushed
  • 1 tablespoon soy sauce
  • 1″ cube ginger, peeled and sliced
1. Put all of the ingredients in a large pot. Bring the mixture to a boil then reduce the heat to low and simmer for 1 hour.
2. Strain through a fine strainer into a large bowl and discard the cooked vegetables.
2. Add salt to taste. I like to make it with a little less salt than usual in case I want to add miso paste (which can be salty) later.

Friday, May 3, 2013

Homemade Shiitake and Tofu Wontons


It’s a good idea to have a go to dumpling recipe. The prepackaged ones are great, but the ingredients can be suspect and who doesn’t like to pick their own fillings?


Sure you can pan fry them, but you can also add them to broth for a light meal or pre-dinner soup. Best of all you can make a bunch and freeze them for a rainy day. So convenient.


Homemade Shiitake and Tofu Wontons
Adapted from the Gyoza recipe in Asian Vegan Kitchen
Ingredients:
  • 1 tablespoon olive oil
  • 1 tablespoon sesame oil
  • 2 garlic cloves, chopped
  • 1/2 inch cube fresh ginger, peeled and minced
  • 3 fresh shiitake mushroom caps, chopped
  • 1/2 small green cabbage, shredded (about 1 1/2-2 cups)
  • 1/4 cup sliced scallions
  • 4 ounces firm tofu, crumbled
  • 1 tablespoon soy sauce
  • 1/2 teaspoon salt
  • 1 teaspoon cornstarch
  • 30 vegan wonton wrappers (Read the ingredients! Many contain egg.)
  • Lil bowl of water
1. In a large skillet, heat the oils over medium high heat. Add the garlic and ginger and cook until fragrant, about 30 seconds.
2. Add the mushrooms, cabbage, scallions and tofu. Turn the heat to high and cook until the liquid from the tofu has evaporates, about 3-5 minutes.
3. Add the soy sauce and salt and cook until the liquid has been absorbed. Sprinkle with the cornstarch and give a good stir. Remove the mixture from the heat.
4. Put a rounded teaspoon of the filling into the middle of a wonton wrapper, moisten the edges with water and fold to seal, pressing the edges into each other. If using round wrappers, leave the shape as is (like a half moon). If using square wrappers, make your wontons in a kind of tortellini shape by bringing the corners together and pressing them to hold the shape. This is a good demonstration from Youtube.
5. At this point you can put them in a single layer on a cookie sheet to freeze. After they’re frozen, toss them in a plastic bag or tupperware and keep them for up to a month. If you want to cook them right way, I recommend panfrying:
  • Heat 2 teaspoons of oil in a skillet over medium high heat and add about 6-10 wontons. Cook them for 2-3 minutes until the bottoms are browned. Add 1/4 cup of water, quickly cover the skillet and cook until the water has been absorbed, about 2-3 minutes. Serve with whatever sauce you’re loving.