Thursday, October 31, 2013

Happy Halloween!


I hope your Halloween is full of pumpkins, black cats, sweets and friendly bats! And remember – while pumpkins are fun to carve and eat they are also the cutest of all gourds. Allow Linus to describe my feelings.


Wednesday, October 30, 2013

Spooky Black Cat Cookies

Meet Spooky:


I met Spooky on 10/30/12 – the day before Halloween. I heard something outside of our apartment meowing something fierce, and when I went to investigate I saw this beautiful jet black cat looking at me like “Well?”. I put my hand down to say hello and he ran right to me like we were old friends.

I spent some time walking with him around the complex, and he followed me everywhere. He was extremely talkative, and kept up a very good conversation! After about an hour of walks, purrs, meows and head boops he bid me adieu. I never saw him again so I’m pretty sure he was some kind of Halloween angel. I’m glad I took this picture to remember him by!

Black cats have it rough with their unlucky reputation. Did you know that black cats are half as likely to be adopted as non-black cats? Crazy! The speculated reasons vary from “black cats aren’t photogenic” to “black cats aren’t unique”, but I think we’re beating around the bush here. Black cats aren’t being adopted because people are crazy.


In my research on this issue I stumbled across this incredible organization in Boston, MA called Black Cat Rescue. They’re a volunteer based group of foster homes for homeless black cats. Their fosters provide love and care while searching for forever homes for these “spooky” felines. What an amazing and generous group of people!

In honor of my own Spooky (and black cats everywhere) I added Spooky Black Cat Cookies to my Halloween cookie list. Like most cookies I make they’re straight from Vegan Cookies Invade Your Cookie Jar by Isa Chandra Moskowitz. Why stray from perfection?


Chocolate Cut-Out Cookies
Makes 36 cookies depending on the size of your cutter
Adapted From Vegan Cookies Invade Your Cookie Jar
Ingredients:
  • 2/3 cup sugar
  • 1/4 cup oil
  • 1/4 cup nondairy milk
  • 1 teaspoon vanilla extract
  • 1 cup all purpose flour
  • 1/2 cup cocoa powder
  • 1 tablespoon cornstarch
  • 1/2 teaspoon baking powder
  • 1/4 teaspoon salt
1. In a mixing bowl whisk together the sugar, oil, milk and vanilla.
2. Add the flour, cocoa powder, cornstarch, baking powder and salt to the sugar mixture and stir to combine. The dough should be slightly stiff and workable. If it’s too wet add a little more flour a teaspoon at a time. I had to add about 3 extra teaspoons of flour. 
3. Divide the dough in half and refrigerate for at least an hour to firm up. 
4. Preheat your oven to 350. 
5. Roll one of the dough halves to 1/4 – 1/8 inch thick. Cut out your desired shapes and bake them on an un-greased baking sheet for 7 minutes. Let the cookies sit on the baking sheet for a couple of minutes before transferring them to a cooling rack. Repeat with the remaining dough. 
6. Let the cookies cool completely before decorating.

Sunday, October 27, 2013

Organized Christmas 2013: Get Organized


Goodness, I’ve been busy! I would go into full detail, but my busyness is all work and all top secret for now :). Busy or not, I have a very real Holiday situation on my hands. Not only is Halloween just days away, but the Christmas Countdown started tonight. This is not a drill! 

I’ve had my mind on the holidays since July (see Organized Christmas in July and Organized Christmas in September) so I’m excited to move full force into the Christmas Countdown. This six week program breaks down holiday tasks into weekly themes: 
  1. Get Organized
  2. Reality Check
  3. Gifts and Giving
  4. Get Cooking
  5. Decorate
  6. Celebrate
For the next six weeks I’ll be busying myself with tasks, projects and daily readings. This is the first week which means we will be getting organized.


The goal for this week is to gather all the tools I’ll need for a successful Christmas Countdown. As with every week there is a checklist, binder instructions and purchase suggestions:

On the Checklist Per Our Needs
  • Follow the daily readings on OrganizedChristmas.com. This is one of my favorite aspects of the countdown. Nothing but helpful and inspiring messages to get me through my planning.
  • Assemble a binder for holiday prep and print this week’s printables
    • I have a special section in my home management binder reserved for The Holidays.
  • Review holiday values with Husband
    • We both agreed that we wanted to spend less on gifts, do more around town (Christmas movies!!), and eat better food – not obligation food. I felt better when we admitted that maybe I didn’t need to make 10 different kinds of cookies this year. The goal is to eliminate pressure wherever we can.
  • Start a master gift list
    • Started this in July
  • Begin a Christmas card list
    • I assembled most addresses last year, and just reprinted the list. I’ve been updating it when need be.
  • Create a Christmas planning center
    • I have a Christmassy candle and tiny Christmas tree that I put on my desk when planning. I also downloaded a Roaring Fireplace app for my tablet, and play the Jazz Christmas playlist on Songza. It’s a very festive workspace!
  • Complete the holiday spruce-up worksheet and schedule to-dos
  • Find cat sitters for holiday travel
  • I added:
    • Finalize the Christmas card plan
    • Print a Thanksgiving dinner planning printable and start planning
    • Look into special Holiday movie screenings and add them to our Calendar
To Buy
  • Order Christmas cards
  • Stamps

It’s going to be a busy week!

Outside of Christmas planning I’m pretty excited about the week. Halloween is four days away so we’ll spend the next few days watching our favorite Halloween movies and eating our favorite Halloween treats. On Halloween night we’ll join some of our favorite people to play games (probably Gloom!) and watch even more movies. We’re thinking about contributing Plan 9 From Outer Space. 


I mean it’s just too ridiculous. How could we not?

Sunday, October 13, 2013

Agedashi Tofu with Perfect Rice


Lately I’ve been cooking so many homey meals, Fall meals, spicy Asian meals, Mexican meals, etc that my husband and I felt like we just needed a time out. Japanese food is great for that.


I love making Japanese meals, and don’t do it enough. It takes meals like this to remind us that delicacy and deep flavor are as much a virtue as the intense and hearty qualities we’re used to.

While I can’t attest to the authenticity of this meal, I can say that it is at the very least heavily inspired by my favorite Japanese flavors and ingredients. I may not be super well versed in the culinary traditions of Japan, but I try my very best!
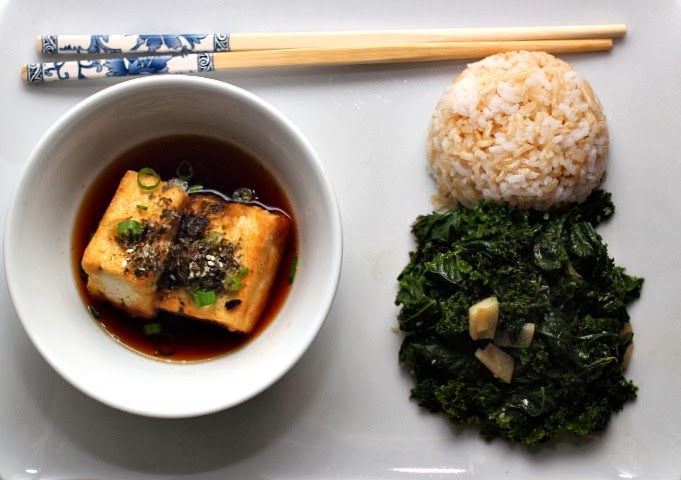
Agedashi Tofu 
Adapted from Agedashi Tofu from Just One Cookbook
Ingredients:
Tofu:
Sauce:
  • 1 cup vegetarian dashi (Azeliaskitchen.net has this great post full of vegetarian dashi. I’m partial to Shiitake Dashi.)
  • 1 nickle sized piece of fresh ginger
  • 2 tablespoons soy sauce
  • 2 tablespoons mirin
1. Cut your tofu into 8 equal pieces. Sprinkle the tofu pieces with salt and dredge them in the rice flour. Set aside.
2. In a heavy bottomed skillet heat your oil over medium heat to about 350 degrees.
2. While your oil is heating combine the sauce ingredients in a saucepan over low heat. Cover the pan to keep the sauce warm until serving.
3. When the oil is ready pan fry the tofu until golden brown on all sides.
4. Remove the ginger from the sauce and divide the tofu between 4 bowls (2 tofus per bowl). Pour an even amount of the warmed sauce over the tofu in each bowl, about 1/4 cup each. Top with the grated celery, sliced scallion and a generous sprinkle furikake. 
5. Serve with a hearty serving of cooked greens and rice.


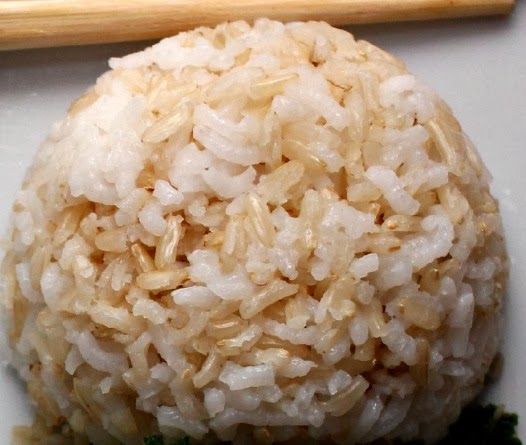
Do you want to know the secret to perfect great tasting rice? According to my experiences and The Internet there are 3 key components to rice perfection:

1. Quality rice. Organic rice makes a difference, you guys. It just does. If you eat rice often, you will notice!
2. Rinsing. Rinse, rinse, rinse your rice! Rinsing rice removes starch, dust and any other impurities. The result is a cleaner tasting rice.
3. Resting after rinsing. I don’t know know why, but you just need to do it. Place the rinsed rice in a fine colander and let it rest for about 30 minutes before cooking normally.

UmamiMart.com has an awesome tutorial on rice preparation that explains the whole process in greater detail!

Things to note:
  1. Soaking is an extra bonus step to amazing rice. In my opinion, a thorough rinse is enough, but a lot of people insist on soaking. Try both!
  2. My go-to rice is a 1-1 combination of medium grain white and brown rice. This combo cooks up perfectly on the Regular setting in my fuzzy logic rice cooker.

Just to ensure that we didn’t feel too healthy, we each had a piece of mochi for dessert! I question the authenticity of peanut mochi, but this was the only one we could find that was vegan and lacked artificial coloring. We both approve!

Tuesday, October 8, 2013

Food for Lovers Queso News, Superfood Salsa News and a Favor

I cannot even believe how busy I’ve been, and I think the world needs to know what I’ve been doing.
Ok, so this is not what I’m referring to, but I do want everyone to know that my husband and I did some American Gladiator style fighting this weekend at Hot Lava Obstacle Course. I also walked through some suspended rings which was very very difficult. Moving on….

I work a lot and I love what I do. I work for a vegan food company that you may recognize. Or maybe you won’t. Either way, I work for Food for Lovers, Inc. We make the World’s First Vegan Queso as well as a new and amazing soon-to-be-released line of Organic Superfood Salsas:


While we’ve been preparing for the release of these incredible new salsas we’ve also been working like crazy to switch our current Queso line from vegan and awesome to vegan, awesome, AND gluten free. This change to our Queso line will also include a really rad re-design. Look!

From:


To:


“What’s that third jar?” you ask? That would be our new Hot Vegan Queso. It’s made with serrano capsaicin, aka This Queso Hurts So Good.

On top of all that we also entered Intuit’s Small Business Big Game contest. The winner gets a Superbowl commercial! Can you imagine a vegan company in a Superbowl commercial?? We made it through Phase 1 and are now sitting pretty in Phase 2. In this phase we had to make a video introducing our product and company. Honest question – How lucky am I to be married to a filmmaker? Food for Lovers CEO and COO Crystal and Chris Tate collaborated with my husband on a fantastic concept and worked liked geniuses to come up with the best video for our company. To see Food for Lovers and my husband be hilarious just watch:


So here’s the thing: I’ve never shamelessly begged for anything, but I’m going to now. Please click on the link above and vote! 

Have you ever had queso? Do you agree that sometimes chips are merely a vessel to get the queso from Not-Your-Mouth to Your Mouth?

Friday, October 4, 2013

Once Upon a Time: Snow White Chili and Cinnamon Hot Chocolate

These two additions to the Once Upon a Time series are all about comfort for a cold day: Snow White Chili and Cinnamon Hot Chocolate. 

While there is no mention of Snow White making chili, I bet she would if she had this recipe.


The chili flavor comes from fresh chiles while the rest of the ingredients are kept very simple. This is one of our favorite recipes, and we eat it quite a bit in the Fall/Winter. It’s so easy and satisfying.

Snow White Chili
Adapted by Vegetarian White Chili from Wheatfreemeatfree.com
Ingredients:
  • 1 medium onion, diced
  • 2 poblanos, seeded and diced
  • 1 jalapeno, seeded and diced
  • 4 cloves of garlic, chopped
  • 1 teaspoon cumin
  • 1 lb. dried white beans
  • 1 quart (4 cups) vegetable broth
  • 2 cups water
  • lots of chopped cilantro
1. Combine all of the ingredients – minus the cilantro – in a large pot and bring to a boil over high heat. 
2. Once the chili is boiling, lower the heat to low and simmer partially covered for 2-3 hours – until the beans are soft.
3. Season with salt to taste at the end of cooking. Top
with cilantro, crushed corn tortilla chips and dust from the diamond mines.

—-

A favorite between Emma and Snow, Cinnamon Hot Chocolate is a classic drink in the Once Upon a Time universe. 

I happen to love cinnamon with chocolate so I was all too ready to make this my first hot chocolate of the season.

Cinnamon Hot Chocolate
Ingredients:

  • 1 tablespoon cocoa powder
  • 1 tablespoon sugar
  • 1/4 teaspoon cinnamon
  • 1/2 teaspoon vanilla
  • 2 tablespoons + 3/4 cup nondairy milk (something a bit thicker like almond) measured separately
1. In your favorite mug combine the cocoa powder, sugar, cinnamon, vanilla and 2 tablespoons of milk. Mix thoroughly with a fork until you’re left with a thick chocolatey syrup. Set aside.
2. Warm the 3/4 cup of milk over medium heat until it reaches your desired temperature.  
3. Pour the warm milk into the chocolate syrup and give it a good stir.
4. Drink up while it’s still hot!


Tuesday, October 1, 2013

Once Upon a Time: Apple Turnovers

I’ve had such a good time making food inspired by my new favorite show, Once Upon a Time! Did you watch the season premier? I’ve been busier than busy, and haven’t had opportunity to actually sit down and watch. I’m still enjoying it via my stomach.

To kick off this mini food series I made Apple Turnovers. Luckily, the only poison in these are cheap fat and sugar! 


Apple Turnovers
Adapted from Apple Turnovers by Ina Garten
Ingredients:
  • 2 lemons
  • 2 big (or 3 medium) tart apples, peeled, cored and cut in a 1/2 inch dice
  • 3 tablespoons sugar, plus extra to sprinkle on top
  • 1 tablespoon all purpose flour
  • 1/4 teaspoon ground cinnamon
  • 1/8 teaspoon ground nutmeg
  • Pinch salt
  • 1 package (2 sheets) frozen puff pastry, defrosted
  • Oil spray (I used coconut)
1. Preheat the oven to 400 degrees F.
2. Put the cut apples into a large bowl. Zest and juice both lemons over the apples and stir to coat.
3. Add the sugar, flour, cinnamon, nutmeg, and salt to the apples and stir to combine.
4. On a lightly floured surface roll each sheet of the puff pastry to a 12×12″ square. Cut each sheet in half and then in half again to end up with 8 equal squares.
5. Brush the edges of each square with a little bit of water. Place about 1/3 cup of the apple mixture onto half of each square and fold the pastry diagonally over the apples. Seal the turnovers by pressing the edges with a fork. 
6. Spray the turnovers with a little bit of oil, and sprinkle with some sugar. Make 2 small slits on the tops and bake for 15-20 minutes, until brown and puffy. Serve warm with a big cup of coffee (or hot chocolate if you’re partial to the ways of Storybrooke!)


Come back this week for more Once Upon a Time inspired recipes!